You could upload images in PNG format but PNG files can be much larger than JPEGs and will eat up both more bandwidth and free image-hosting space.
In order to upload JPEGs with their original compression you'll have to sidestep Blogger's image uploader and go straight to Picasa's downloadable uploader. (Picasa is Google's image-hoster which stores all the images you upload to Blogger).
This article describes how to upload original compression JPEGs to Picasa and then display them in your blog.
(Update: You may also want to try disabling Blogger's auto-enhance feature for photos.)
1.) Download Google's Picasa
As mentioned above, Picasa is Google's image-hosting service which hosts all the images you upload to Blogger. In order to see all the images you've ever uploaded to your blog, you can sign in to your Picasa account (same login as your Google account) and click on the album named after your blog.
To upload JPEG images with their original compression, you will have to download and install the free Picasa photo editing software (link).
After installing, Picasa will want to index the images on your computer. This could take time so be prepared to wait a while before proceeding. Picasa will probably still be useable while indexing, however.
2.) Upload Images with Picasa
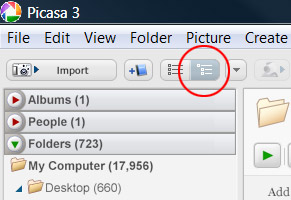
If you have trouble understanding Picasa's folder file browsing structure, you can click the button for showing a more typical tree structure:
Browse to the image you want to upload and then double-click it.
If you don't find the file you're looking for then you might have to browse for the file manually (this means Picasa didn't find the file when indexing your hard drive). Use 'Add File to Picasa...' from the Picasa 'File' menu to browse for the file using the standard file browser for your operating system.
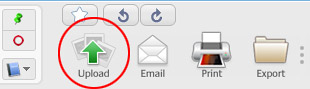
After you've double-clicked the image you want to upload you'll notice a set of commands along the bottom of the program window. Click the 'Upload' icon:
(Update: This icon has changed to a 'Share on Google+' icon in more recent versions of Picasa.)
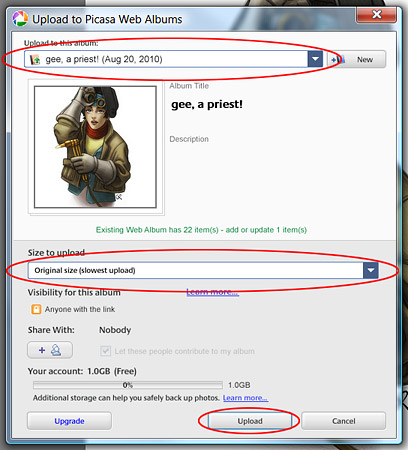
From the first drop-down list in the new dialog box which opens, choose the Picasa web album named after your blog. For 'Size to upload', choose 'Original size (slowest upload)', and then click 'Upload'.
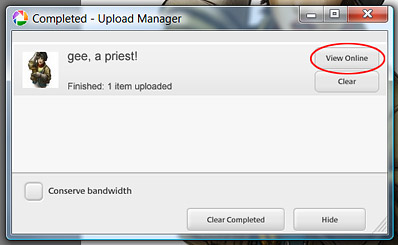
After the image has uploaded, click the 'View Online' button to be taken directly to your Picasa web album.
(Update: In newer versions of Picasa, the 'View Online' button might take you to your Google+ page. You can still go to your Picasa web album by going to https://picasaweb.google.com/)
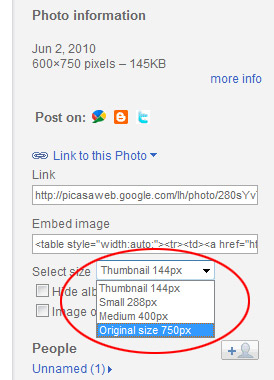
From the Picasa web album page, click on 'Link to this Photo' to open image linking options. From the 'Select size' drop-down, choose 'Original size'. (Note that the original size will only be displayed as an option if the image's largest dimension is less than or equal to 800 pixels. There is still a way to display larger images, however, which I will explain later.)
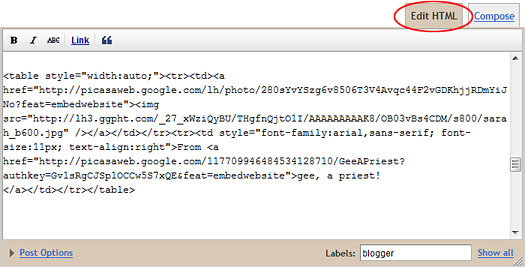
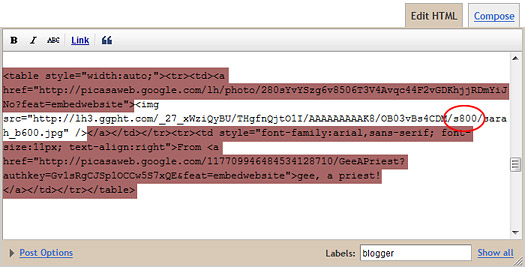
Click in the 'Embed image' field to select the text, then press 'Ctrl+C' to copy the code to your clipboard. In your blog post editor, switch to 'Edit HTML' mode and then paste the code ('Ctrl-V') where you would like the image to appear.
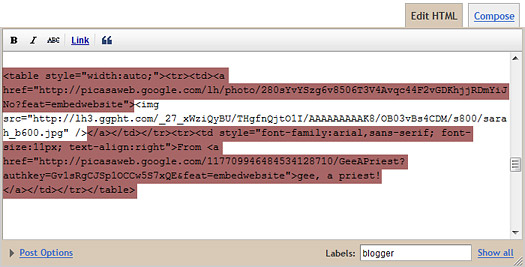
To simplify the code, you can delete the tags I've highlighted below. All you really need is the content within the <img> tag.
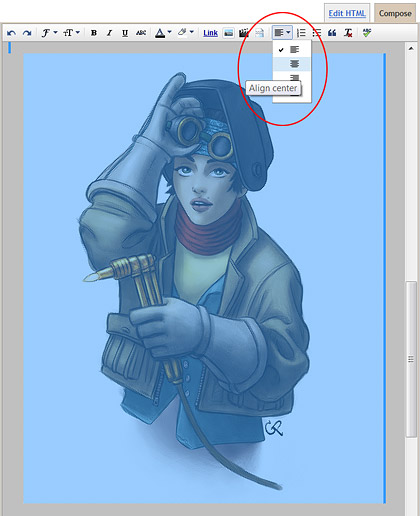
If you wish to center the image, switch back to 'Compose' mode, drag over the image to select it, and then change the alignment to 'center'.
3.) Linking to Images larger than 800 pixels.
Usually, 800 pixels is plenty big enough for images displayed on a blog. However, if you have an image with a vertical dimension bigger than 800 pixels, or you just want to show a larger image, you can modify the code that you cut and paste from your Picasa album to show images up to 1600 pixels per side.
The portion of code preceded by an 's', like in '/s800/', represents the max thumbnail size for the image. This means that the image's largest side must be smaller than 800 pixels, or else the image will be shrunk to fit.
If you change the number after the 's' to '1600', then '1600' will become the new max thumbnail size, and any image with a side smaller than 1600 pixels will display at original size:
Conclusion:
Though Blogger tries to simplify posting images to blogs, it also overly compresses JPEG images, complicating things for people that prefer to compress their own files. By allowing the alternative PNG format, Blogger also tends to encourage these users to upload images with a larger file size, which can use up more bandwidth and image-hosting space. Fortunately, the free Picasa photo-editing software offered by Google can be used to upload original quality JPEGs which, with a little HTML editing, can be displayed in high-quality on a blog.
you mean, other than what you've explained, there's no other way to upload pics in their original form? pretty annoying if you ask me :-/
ReplyDeleteThanx for the info. i just came to know about it :(
@Gula
ReplyDeleteIt's the only way I've found so far. Hopefully Google will fix this, as the simplest alternative (using PNGs) uses more disk space for them.
Thanks for posting this. I've been annoyed as hell at the poor quality of my images on Blogger. I'm going to try this fix.
ReplyDeleteHaha! i know i took too long to try out this guide :p
ReplyDeleteCouple of bumps at first. Picasa 3 (beta) works on Ubuntu 10.10, Picasa 2.7 doesn't :(. Have to place pics on the Desktop for Picasa to detect them, otherwise pics are not detected when placed somewhere in Ubuntu's system.
Here's my result
http://gulaley.blogspot.com/2010/09/selamat-hari-raya-aidil-fitri.html
Though, you can notice that i didn't follow your guide exactly.
- didn't simplify the code since my pic is way too large than 1600 pix as its original size, also to enable access (link) to the original pic for download
- the album containing the pic is on the upper right-hand corner instead of bottom right
Great guide. Thanx! :D
@Shelley and @Gula,
ReplyDeleteGlad to be of help! :) I haven't tried uploading pics lately but I'm guessing Blogger still hasn't made things easy for us. :(
thanks for this!!!
ReplyDeletethanks for your help...
ReplyDeletehttp://lifeisapumpkin.blogspot.com/2011/04/gee-priest.html
Thanks for this. I've just done some research after a comment about the quality of a pic on my blog and I discovered this post. Followed the instructions and it now looks loads better.
ReplyDeleteTo upload images to Google is very simple and could easily be done with the help of picasa. Download the free picasa software and install it on your PC, get it synchronized to your email id. once synchronized all you need is simple move the images from your computer hard disk to the picasa default folder and it will become live on Google images search engine. Here is the video How to upload images to google images using picasa
ReplyDelete